Painting Your Kitchen Cabinets for a Fresh Look: A Step-by-Step Guide
Revitalizing your kitchen doesn’t always require a complete overhaul. One budget-friendly and transformative way to give your kitchen a fresh look is by painting your cabinets. This step-by-step guide will walk you through the process, from preparation to finishing touches, ensuring a successful cabinet makeover that breathes new life into your culinary space.
Gather Your Materials
- Before diving into the painting process, gather the necessary materials:
- Screwdriver
- Sandpaper (medium and fine grit)
- TSP (Trisodium Phosphate) or a degreasing cleaner
- Painter’s tape
- Drop cloths or plastic sheets
- High-quality paintbrushes and rollers
- Primer suitable for your cabinet material
- Cabinet paint in your chosen color and finish
- Clear protective topcoat (optional)
Remove Cabinet Doors and Hardware
Use a screwdriver to remove cabinet doors, drawers, and any hardware such as handles and hinges. Label each piece with painter’s tape to make reassembly easier. Lay the pieces out in a well-ventilated area.
Degrease and Clean
Clean the cabinet surfaces thoroughly to remove grease, grime, and residues. Mix TSP with water following the manufacturer’s instructions or use a degreasing cleaner. Wipe down all surfaces, including the front and back of doors and drawers.
Sand the Surfaces
Lightly sand all cabinet surfaces with medium-grit sandpaper. This step helps the primer adhere better. Follow up with fine-grit sandpaper for a smoother finish. Ensure all surfaces are free of dust before moving on.
Choose the Right Primer
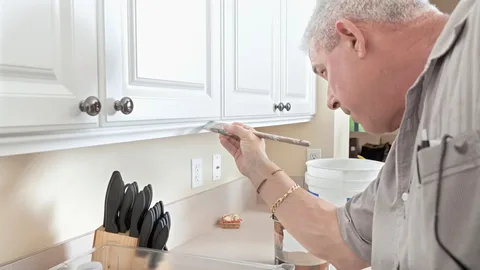
Select a high-quality primer suitable for your cabinet material. For wood cabinets, a bonding primer is ideal. Apply the primer evenly using a high-quality paintbrush or roller. Allow the primer to dry completely before moving on to the next step.
Select Your Paint Color and Finish
Choose a durable, high-quality cabinet paint in your desired color and finish. Semi-gloss and satin finishes are popular choices for kitchen cabinets due to their easy cleaning and durability.
Apply the First Coat
Start by painting the cabinet frames with a brush, following the wood grain. Use a small roller for larger surfaces to achieve a smooth finish. Apply a thin, even coat, allowing it to dry completely before applying a second coat.
Paint the Doors and Drawers
Paint the cabinet doors and drawers using the same technique as the frames. Ensure an even application, and allow each coat to dry thoroughly before applying subsequent coats. Multiple thin coats yield a more professional and durable finish than one thick coat.
Ensure Proper Drying Time
Allow the painted cabinets to dry completely between coats. The drying time may vary based on factors such as humidity and the type of paint used. Refer to the paint manufacturer’s instructions for specific drying times.
Consider a Clear Protective Finish
For added durability and protection against daily wear and tear, consider applying a clear protective topcoat. This step is optional but recommended, especially for high-traffic kitchens. Follow the manufacturer’s instructions for application and drying times.
Carefully Reattach Doors and Hardware
Once the paint and protective finish (if applied) are fully dried, carefully reattach the cabinet doors and hardware. Follow the labels you created during disassembly to ensure proper alignment.
Admire the Transformation
Step back and admire your newly painted kitchen cabinets. The refreshed look can significantly impact the overall aesthetics of your kitchen, providing a cost-effective and rewarding upgrade.
Tips for Success
Take Your Time: Rushing the process can lead to uneven results. Allow adequate drying time between coats and before reassembling your cabinets.
Quality Materials Matter: Invest in high-quality paint, brushes, and rollers to achieve a professional finish that lasts.
Proper Ventilation: Ensure good ventilation in your workspace, especially when working with primers, paints, and topcoats.
Labeling:Labeling doors, drawers, and hardware during disassembly makes reassembly much smoother.
Protect Surrounding Areas: Use drop cloths or plastic sheets to protect countertops, floors, and other surfaces from paint splatter.
Conclusion
By following this step-by-step guide, you can transform your kitchen cabinets and breathe new life into your culinary space. Painting your cabinets is a cost-effective and rewarding DIY project that allows you to achieve a fresh, updated look without a major renovation. Enjoy your newly revitalized kitchen!